
A small and easy modification to vintage clothing.
Sometimes one may come across a vintage dress that is lovely and fits your size but for some reason wants to remain unworn.
I have found that the reason for me often may be with the sleeves; they might be in a length that is not practical for my needs or then just do not fit me well.
As clothes are not only meant to be admired on a rack in your wardrobe but rather meant to be worn and look good on you, a little alteration may come in handy - one of my favourite tricks when modifying dresses is to alter the sleeves and,
as a bonus, turn the cut-off fabric into something else for the dress instead!

First though, a little side comment on modifying vintage. Smaller alterations - like taking something in in the waist or shortening the hem - is one thing that you can do without that much skill or the need to think twice, but altering a piece of clothing to change it’s look or function is another.
In my younger years (in the late 1990’s, let that work as an excuse) I have rather brutally DIY some items - changed the silhouettes of skirts, tie-dyed and painted on clothing and cut high waists into low ones,
modifications that I have later regretted deeply when later realising
I would have loved to wear the item in it’s original state.
modifications that I have later regretted deeply when later realising
I would have loved to wear the item in it’s original state.

Now some 15-20 years later I am more cautious when reaching for the scissors, having learnt that modifying a piece to change it’s whole shape and structure might not be worth it, but on the other hand I also know that a little thought-trough tweaking and re-vamping can improve a piece of clothing for you in many ways!

So having that said, this alteration definitely serves as the later. And the good part is that sleeves are easily alternated, so no special skills are required!
The even better part is that not only do you get a dress that suits you better, but you can take it one step further by using the old sleeves fo make matching accessories to your dress - belts, pussy bows, ribbons etc.
Or - turn the left over fabric into pockets!
Or - turn the left over fabric into pockets!
Few things beat a dress with pockets, especially in days like these when we like to keep our smartphones close.

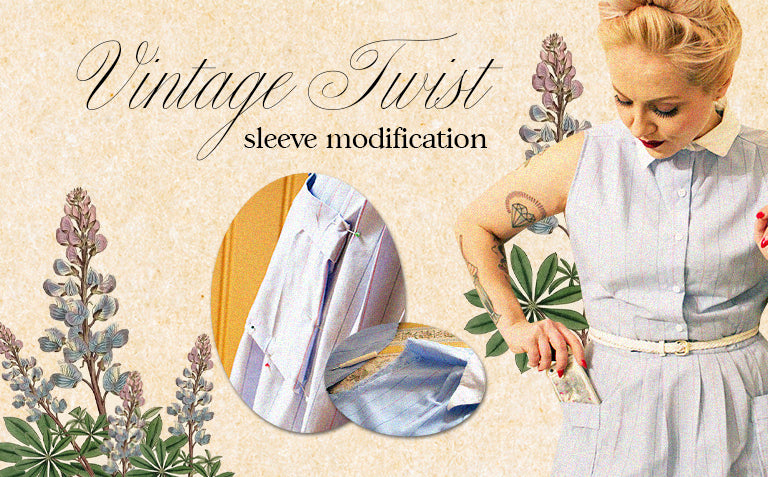
To start with, determine the length of your sleeves and remember to add a couple of centimetres for the seam. Cut the sleeves shorter, fold and finish the edges,
ta-daaaaa, you’re done!
If you want to remove the sleeves altogether use a seam ripper and carefully open up the seams, then fold and sew the edges around the arm opening.
Depending on the garment, use a thread matching the colour of the clothing or, if it suits the style of the dress, go for a contrast coloured seam,
perhaps with zig zag stitches.
Depending on the garment, use a thread matching the colour of the clothing or, if it suits the style of the dress, go for a contrast coloured seam,
perhaps with zig zag stitches.

If your skirt has seams in the side you can make your old sleeves into hidden pockets, but for a faster and less of a forehead-wrinkly option,
make patch pockets (which also has a nice vintage vibe to it)!
Choose the size and model of your pocket - a square is always easy to work with - and sew the edges.
Make sure you have a good space to work in in order to spread out the dress properly (or let it hang from a mannequin) and pin the pockets in place.
If your skirt is pleated or gathered you will have to be extra careful with the placement, in order not to interfere with how the skirt hangs.
Sew on with a machine (or even per hand, if you’re patient enough), and then go out and wear your newly-pocketed dress!

If you still have fabric over, or if you want to try out something else than pockets cut the fabric of the sleeves into a ribbon to tie around your neck,
or make a hairband out of it.
Or perhaps a small matching purse/ make up bag?
In any case, happy sewing and happy dress-wearing!
Ulrika / The Freelancer’s Fashion Blog